Cisco CP-78xx Setup and Configuration

Cisco 78xx Series IP Phones are straightforward VoIP desk phones commonly used in offices for basic calling needs. They support the SIP protocol.
You can often buy a second‑hand unit in decent condition for around 10€. Why so cheap? Because the Enterprise variant expects Cisco infrastructure. Fortunately, with a little effort this can be substituted with commonly available software and manual configuration. The phone is usually sold without a power supply. It works best with a router that provides PoE. Unlike older Cisco phones using a proprietary PoE standard, this model uses the common IEEE 802.3af standard. Alternatively, you can power it from a 48V DC power supply.
It's worth to mention that the phone is available with 2 versions of the firmware.
- Enterprise firmware — the standard version intended for use with Cisco’s call‑control systems (e.g., Cisco Unified Communications Manager / CUCM). This is why second‑hand phones are inexpensive.
- MultiPlatform Phone (MPP) firmware (also called 3PCC) — for third‑party SIP/cloud/VoIP systems or cloud services like Webex Calling. It’s more expensive, but configurable via the built‑in web interface and does not require Cisco infrastructure.
You can convert an Enterprise phone to MPP, but it’s not free. Cisco charges a license fee of around 60€ for the firmware. At that price, buying a ready‑to‑use SIP phone often makes more sense. If you later revert to Enterprise firmware, you’ll pay again.
This article covers only phones running Cisco’s Enterprise (CUCM) firmware. It does not apply to MPP/3PCC firmware. The instructions and configuration are valid for all Cisco CP‑78xx series models: CP-7811, CP-7821, CP-7841, CP-7861, CP-7832.
INFO
Please note that online documentation for XML files is not always applicable to CP78xx series phones. This document contains only verified information that is guaranteed to work, whereas some details found elsewhere apply only to older models, such as the 79xx or 88xx series. Tested with version 14 and partially with version 12 of the firmware.
Applications
- Small home or business phone network with free Asterisk VoIP software
- Integration with commercial VoIP services for inexpensive domestic/international calling
- Integration with doorbells or intercoms using SIP
What do you need
- Ethernet network
- TFTP server to provide configuration files
- Optional web server to host the phone directory
- Optional router with PoE to eliminate the external power supply
What you can do
- Make calls over the network (VoIP/SIP)
- Receive calls
- Use third‑party VoIP services for inexpensive local/international calls
- Use a phonebook
What you cannot do
- View call logs
- Edit phonebook entries using the phone UI
- Modify most phone properties from the phone UI
Preparation
TFTP Server
TFTP is a simple file server that serves configuration files for the phone, specifically SEPXXXXXXXXXXXX.cnf.xml.
This is a crucial component. When the phone powers up it always connects to TFTP, so the server must be consistently available.
Install it on a Linux host, or use your router if it supports the TFTP protocol.
For Ubuntu:
bash
sudo apt install tftpd-hpaFor diagnostics, increase log verbosity to see which files the phone requests. Edit /etc/default/tftpd-hpa and add or modify: TFTP_OPTIONS="--secure -vvv" On Ubuntu, you can watch logs executing command:
bash
journalctl -u tftpd-hpa -fBy default on Ubuntu, the TFTP server root directory is /srv/tftp; store the phone configuration file there.
Phone
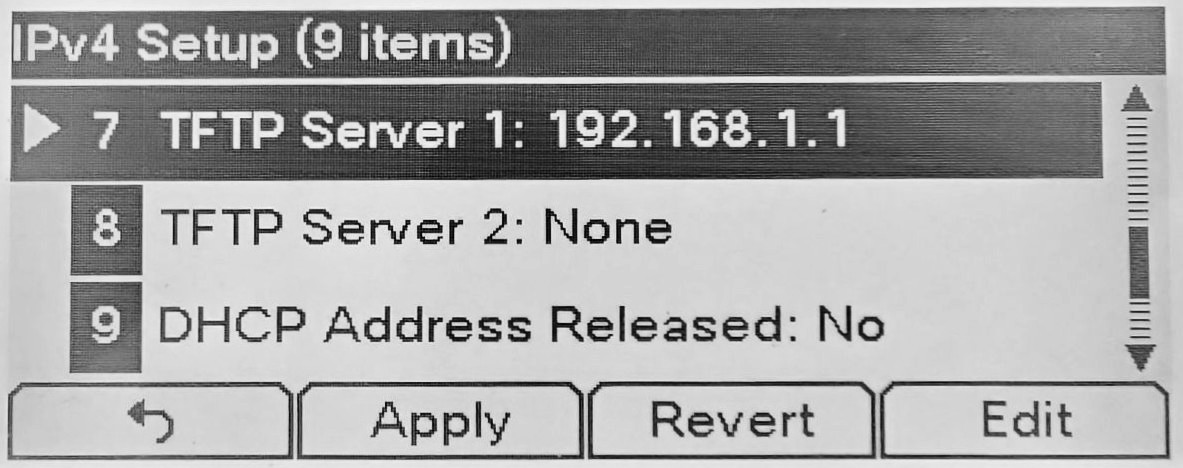
Set the phone’s TFTP server address and perform a factory reset at least once after purchase.
- Power off the phone (remove the Ethernet cable or external power if present).
- Press and hold # on the keypad.
- While holding #, power on the phone.
- When the line buttons start blinking, release #.
- After the boot sequence completes, press the Application button ⚙.
- Navigate to Admin Settings → Network Setup → IPv4 Setup → Alternative TFTP and set it to
Yes. - At the same menu level set
TFTP Server 1to your TFTP server IP (for example192.168.1.1). - Press the
Applysoftkey. - Power‑cycle the phone.
During boot the phone will connect to the TFTP server and download SEPXXXXXXXXXXXX.cnf.xml.
INFO
Expect the phone to take about two minutes to complete its boot sequence.
INFO
You do not need to use # for every test. The phone downloads SEPXXXXXXXXXXXX.cnf.xml every time it boots.
Web server
You need a web server to enable phone directory functionality. This is optional.
Installation of a web server is out of scope for this document. See online guides for Nginx or Apache.
Ensure the server sets the correct content type text/xml for XML files.
Verify file access
Create a sample phonebook XML file and store it on the server. For simplicity, assume it’s in the web root and the server IP address is 192.168.1.1.
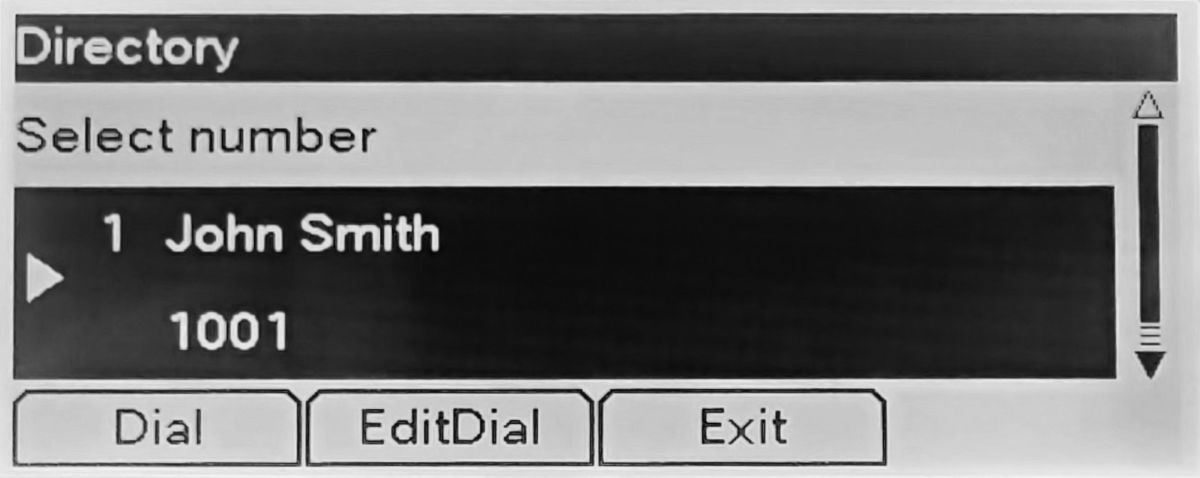
Sample XML phone directory.
XML
<?xml version="1.0" encoding="UTF-8"?>
<CiscoIPPhoneDirectory>

<Title>Directory</Title>
<Prompt>Select number</Prompt>

<DirectoryEntry>
  <Name>John Smith</Name>
  <Telephone>1001</Telephone>
</DirectoryEntry>

<DirectoryEntry>
  <Name>Mary Johnson</Name>
  <Telephone>1002</Telephone>
</DirectoryEntry>

</CiscoIPPhoneDirectory>
Now, use curl to check headers
bash
curl -I http://192.168.1.1/directory.xmlVerify the content type is text/xml. Note that application/xml is not accepted.
http
HTTP/1.1 200 OK
Server: nginx/1.24.0 (Ubuntu)
Content-Type: text/xml
Now, check if the file can be downloaded:
bash
curl http://192.168.1.1/directory.xmlYou should see the content of the file.
WARNING
On Windows, install curl and use curl.exe in PowerShell, not curl (which is an alias for a PowerShell cmdlet).
Configuration
The main configuration file the phone downloads on every startup is SEPXXXXXXXXXXXX.cnf.xml, where XXXXXXXXXXXX is the phone’s MAC address.
First, get the phone host name that includes the MAC address. See the Device Information section on the phone’s web page.
Service mode     On-premise
Service domain
Service state    Idle
MAC Address      XXXXXXXXXXXX
Host Name        SEPXXXXXXXXXXXX
Create a new XML file: SEPXXXXXXXXXXXX.cnf.xml (replace XXXXXXXXXXXX with the MAC address).
Copy the content below and update the fields noted:
Sample XML configuration
XML
<device>
<!-- Phone menu accessed by directory key (book icon). -->
<!-- <directoryURL>http://192.168.1.1/menu.xml</directoryURL> -->
<!-- Phone directory accessed by Application button (cog icon) -->
<!-- <servicesURL>http://192.168.1.1/directory.xml</servicesURL> -->
<fullConfig>true</fullConfig>
<deviceProtocol>SIP</deviceProtocol>
<sshUserId>cisco</sshUserId>
<sshPassword>cisco</sshPassword>
<devicePool>
<!-- Time sync.
Modify NTP server to a nearby one.
Change timeZone as needed.
-->
<dateTimeSetting>
<dateTemplate>D.M.Y</dateTemplate>
<timeZone>Central Europe Standard/Daylight Time</timeZone>
<ntps>
<ntp>
<!-- Use IP address not DNS name, otherwise time won't be updated-->
<name>162.159.200.1</name> <!-- pool.ntp.org -->
<ntpMode>Unicast</ntpMode>
</ntp>
</ntps>
</dateTimeSetting>
<callManagerGroup>
<members>
<member priority="0">
<callManager>
<ports>
<ethernetPhonePort>2000</ethernetPhonePort>
<sipPort>5060</sipPort>
<securedSipPort>5061</securedSipPort>
</ports>
<processNodeName>[SIP Host Address]</processNodeName>
</callManager>
</member>
</members>
</callManagerGroup>
</devicePool>
<!-- Must match the phone firmware version -->
<!-- To upgrade, put the new version here -->
<loadInformation>sip78xx.14-4-1-0001-36</loadInformation>
<sipProfile>
<sipProxies>
<backupProxy></backupProxy>
<backupProxyPort></backupProxyPort>
<emergencyProxy></emergencyProxy>
<emergencyProxyPort></emergencyProxyPort>
<outboundProxy></outboundProxy>
<outboundProxyPort></outboundProxyPort>
<registerWithProxy>true</registerWithProxy>
</sipProxies>
<sipCallFeatures>
<cnfJoinEnabled>true</cnfJoinEnabled>
<callForwardURI>x-serviceuri-cfwdall</callForwardURI>
<callPickupURI>x-cisco-serviceuri-pickup</callPickupURI>
<callPickupListURI>x-cisco-serviceuri-opickup</callPickupListURI>
<callPickupGroupURI>x-cisco-serviceuri-gpickup</callPickupGroupURI>
<meetMeServiceURI>x-cisco-serviceuri-meetme</meetMeServiceURI>
<abbreviatedDialURI>x-cisco-serviceuri-abbrdial</abbreviatedDialURI>
<rfc2543Hold>false</rfc2543Hold>
<callHoldRingback>2</callHoldRingback>
<localCfwdEnable>true</localCfwdEnable>
<semiAttendedTransfer>true</semiAttendedTransfer>
<anonymousCallBlock>2</anonymousCallBlock>
<callerIdBlocking>2</callerIdBlocking>
<dndControl>0</dndControl>
<remoteCcEnable>true</remoteCcEnable>
</sipCallFeatures>
<sipStack>
<sipInviteRetx>6</sipInviteRetx>
<sipRetx>10</sipRetx>
<timerInviteExpires>180</timerInviteExpires>
<timerRegisterExpires>3600</timerRegisterExpires>
<timerRegisterDelta>5</timerRegisterDelta>
<timerKeepAliveExpires>120</timerKeepAliveExpires>
<timerSubscribeExpires>120</timerSubscribeExpires>
<timerSubscribeDelta>5</timerSubscribeDelta>
<timerT1>500</timerT1>
<timerT2>4000</timerT2>
<maxRedirects>70</maxRedirects>
<remotePartyID>true</remotePartyID>
<userInfo>None</userInfo>
</sipStack>
<autoAnswerTimer>1</autoAnswerTimer>
<autoAnswerAltBehavior>false</autoAnswerAltBehavior>
<autoAnswerOverride>true</autoAnswerOverride>
<transferOnhookEnabled>false</transferOnhookEnabled>
<enableVad>false</enableVad>
<preferredCodec>g711ulaw</preferredCodec>
<dtmfAvtPayload>101</dtmfAvtPayload>
<dtmfDbLevel>3</dtmfDbLevel>
<dtmfOutofBand>avt</dtmfOutofBand>
<alwaysUsePrimeLine>false</alwaysUsePrimeLine>
<alwaysUsePrimeLineVoiceMail>false</alwaysUsePrimeLineVoiceMail>
<kpml>3</kpml>
<natEnabled>true</natEnabled>
<natAddress></natAddress>
<phoneLabel>CP-7821</phoneLabel>
<stutterMsgWaiting>0</stutterMsgWaiting>
<callStats>false</callStats>
<silentPeriodBetweenCallWaitingBursts>10</silentPeriodBetweenCallWaitingBursts>
<disableLocalSpeedDialConfig>false</disableLocalSpeedDialConfig>
<startMediaPort>16384</startMediaPort>
<stopMediaPort>32766</stopMediaPort>
<!-- Uncomment to access phone directory by line 2 button -->
<!--
<sipLines>
<line button="2">
<featureID>20</featureID>
<featureLabel>Phonebook</featureLabel>
<serviceURI>http://192.168.1.1/directory.xml</serviceURI>
</line>
-->
<!-- SIP settings -->
<line button="1">
<featureID>9</featureID>
<!-- What is displayed on Line 1 -->
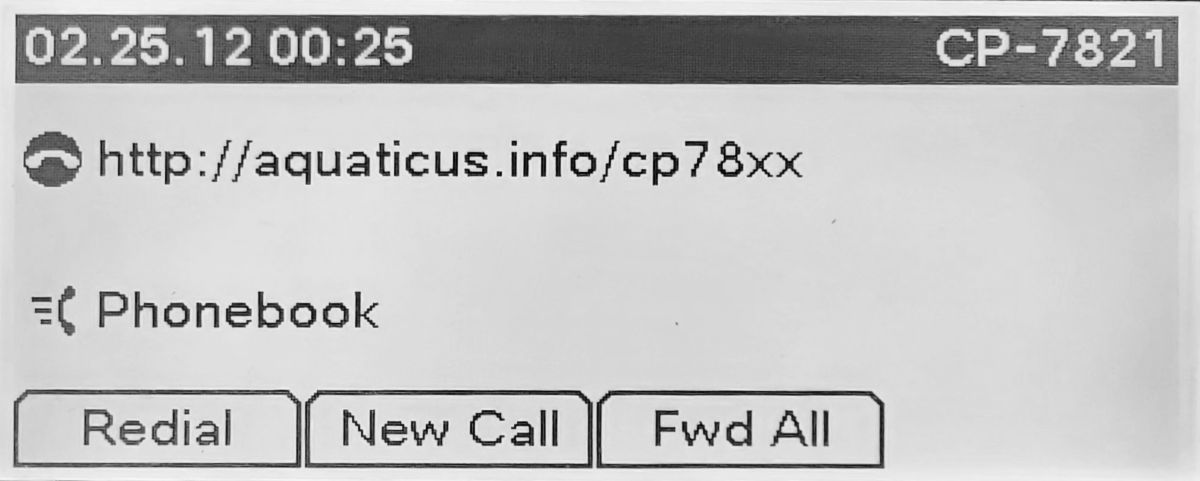
<featureLabel>http://aquaticus.info/cp78xx</featureLabel>
<proxy>USECALLMANAGER</proxy> <!-- DO NOT MODIFY -->
<port>5060</port>
<name>[SIP Account]</name>
<displayName>[SIP Account]</displayName>
<autoAnswer>
<autoAnswerEnabled>2</autoAnswerEnabled>
</autoAnswer>
<callWaiting>3</callWaiting>
<authName>[SIP Account]</authName>
<authPassword>[SIP Password]</authPassword>
<sharedLine>false</sharedLine>
<messageWaitingLampPolicy>1</messageWaitingLampPolicy>
<messageWaitingAMWI>1</messageWaitingAMWI>
<messagesNumber>901</messagesNumber>
<ringSettingIdle>4</ringSettingIdle>
<ringSettingActive>5</ringSettingActive>
<contact>[SIP Account]</contact>
<forwardCallInfoDisplay>
<callerName>true</callerName>
<callerNumber>false</callerNumber>
<redirectedNumber>false</redirectedNumber>
<dialedNumber>true</dialedNumber>
</forwardCallInfoDisplay>
</line>
</sipLines>
<voipControlPort>5060</voipControlPort>
<dscpForAudio>184</dscpForAudio>
<ringSettingBusyStationPolicy>0</ringSettingBusyStationPolicy>
<!-- Uncomment to enable dial plan -->
<!-- <dialTemplate>dialplan.xml</dialTemplate> -->
<!-- Uncomment to configure soft keys-->
<!-- <softKeyFile>softkey.xml</softKeyFile> -->
</sipProfile>
<commonProfile>
<phonePassword></phonePassword>
<backgroundImageAccess>true</backgroundImageAccess>
<callLogBlfEnabled>2</callLogBlfEnabled>
</commonProfile>
<vendorConfig>
<disableSpeaker>false</disableSpeaker>
<disableSpeakerAndHeadset>false</disableSpeakerAndHeadset>
<pcPort>0</pcPort>
<settingsAccess>1</settingsAccess>
<garp>0</garp>
<voiceVlanAccess>0</voiceVlanAccess>
<videoCapability>0</videoCapability>
<autoSelectLineEnable>0</autoSelectLineEnable>
<webAccess>0</webAccess>
<spanToPCPort>1</spanToPCPort>
<loggingDisplay>1</loggingDisplay>
<loadServer></loadServer>
</vendorConfig>
</device>INFO
For list of available configuration options refert to https://usecallmanager.nz/sepmac-cnf-xml.html
SIP Account
Replace the following tokens with SIP account‑specific data. These are provided by your VoIP provider or Asterisk PBX.
[SIP Host Address][SIP Account][SIP Password]
Voicemail number
You can set the number dialed when the Messages button (tape icon) is pressed. It can be any number, not necessarily voicemail (e.g., 112 or 911).
Replace [Voicemail number] with the actual number.
Phone directory
If you configured a web server to provide the directory XML, your phone can display phonebook entries. You have three options:
Add directory item to the menu assigned to Directory button 🕮.
Uncomment the following line and replace URL to valid one.
xml<directoryURL>http://192.168.1.1/menu.xml</directoryURL>
For more details see Phone Menu section below.
Assign the directory to the Application button ⚙. This works, but the standard options available under this key will no longer be available. Uncomment the following line and replace the URL with a valid one.
xml<servicesURL>http://192.168.1.1/directory.xml</servicesURL>Assign the directory to Line 2. Recommended if you got 1 line. Uncomment the following line and replace the URL with a valid one.
xml<sipLines> <line button="2"> <featureID>20</featureID> <featureLabel>Phonebook</featureLabel> <serviceURI>http://192.168.1.1/directory.xml</serviceURI> </line>
Note: you can assign directories to all three buttons at the same time with different URLs.
Dynamic Directory
Instead of serving a static XML file, you can configure the HTTP server to generate the directory dynamically from external sources (e.g., Google Contacts or similar systems).
WARNING
<CiscoIPPhoneDirectory> supports a maximum of 32 entries. Exceeding this limit causes an "XML parsing error" on the phone.
Time format
You can change the date format via <dateTemplate>, for examples: D.M.Y, M/D/Y, Y-M-D. Set the NTP server close to your location for faster, reliable sync.
Specify the NTP server using an IP address rather than a DNS name. For some unknown reason, the phone won't update its clock even though NTP packets are received.
Phone Menu
You can assign a menu to the Directory button 🕮. Each menu item must point to an XML file containing configuration settings.
The XML file must include a <CiscoIPPhoneMenu> element. You cannot assign a phone directory <CiscoIPPhoneDirectory> or any other object directly.
Create a menu.xml file with a <CiscoIPPhoneMenu> section. For example:
xml
<?xml version="1.0" encoding="UTF-8"?>
<CiscoIPPhoneMenu>
<Title>Corporate Menu</Title>
<Prompt>Select a service</Prompt>

  <MenuItem>
    <Name>Corporate Directory</Name>
    <URL>http://192.168.1.1/directory.xml</URL>
  </MenuItem>

  <MenuItem>
    <Name>Family contacts</Name>
    <URL>http://192.168.1.1/family.xml</URL>
  </MenuItem>

  <MenuItem>
    <Name>Call helpdesk</Name>
    <URL>http://192.168.1.1/helpdesk.xml</URL>
  </MenuItem>

</CiscoIPPhoneMenu>
To display a list of phones, the XML file should contain a <CiscoIPPhoneDirectory> element. See the sample XML section for reference.
To create a menu item that dials a number immediately, create a file such as helpdesk.xml:
xml
<?xml version="1.0" encoding="UTF-8"?>
<CiscoIPPhoneExecute>
  <ExecuteItem Priority="0" URL="Dial:1001"/>
</CiscoIPPhoneExecute>
Upgrade
You can upgrade the phone firmware for free, but only to the Enterprise version.
Create a free support account at https://id.cisco.com (Sign Up). Verification can take time; accounts may be temporarily blocked, especially if accessed via VPN or with a suspicious email domain. After logging in, complete your user profile and enter your address. You cannot download files without an address.
Navigate to the Software Download section: https://software.cisco.com/download/home/284892535/type/282074288 The firmware image is the same for all CP‑78xx models. Select the latest release zip file and click the download icon. The filename should start with
cmterm-78xx, e.g.,cmterm-78xx.14-4-1-0001-36_REL.zip. Do not download the MPP release — it will not install. If the download fails with an account verification message, wait (from minutes up to a day) and try again.Unpack all files into the TFTP server root directory — the same place where your
SEPXXXXXXXXXXXX.cnf.xmlfile is stored. You should see files similar to:
bash
 kern2.78xx.14-4-1-0001-36.sbn
 kern78xx.14-4-1-0001-36.sbn
 rootfs2.78xx.14-4-1-0001-36.sbn
 rootfs78xx.14-4-1-0001-36.sbn
 sboot2.78xx.14-4-1-0001-36.sbn
 sboot78xx.14-4-1-0001-36.sbn
sip78xx.14-4-1-0001-36.loads- Modify the
SEPXXXXXXXXXXXX.cnf.xmlconfiguration file. Edit the<loadInformation>tag; set it to the version string (the part before the.loadsextension).
XML
<loadInformation>sip78xx.14-4-1-0001-36</loadInformation>Optionally show TFTP access logs (make sure you set
-vvvin the TFTP config file). For Ubuntu:bashjournalctl -u tftpd-hpa -fPower cycle the phone. The phone will automatically detect new firmware during initial setup. Observe TFTP log, you should see it downloads
.loadsfile and then the rest of the files. It may take some time. When download process is finished, you'll see prompt on the phone screen to confirm upgarde.When the phone powers up, verify the software version. Access phone web server and go to Device Information tab. Relevant information:
App Load ID      rootfs78xx.14-4-1-0001-36
Boot Load ID     sboot78xx.14-4-1-0001-36
Version          sip78xx.14-4-1-0001-36
Phone stand
Second‑hand units are often sold without a desk stand. A compatible 3D‑printable model (fits all CP‑78xx phones) is available on Thingiverse: https://www.thingiverse.com/thing:6877953
Known Problems
Incorrect Time Display
The time and date shown on the phone may be incorrect.
The phone uses NTP to obtain the current time. Even if NTP packets are received, the phone may fail to update the display. First, eliminate obvious causes:
- Incorrect time zone in the
<timeZone>tag (typos or unsupported zone). - Incorrect NTP server name or DNS resolution issues.
- NTP server unreachable. If the phone lacks internet access,
pool.ntp.orgwill not be accessible. In that case, run a local NTP server.
DANGER
Always specify the NTP server using an IP address. For some strange reason, if the <name> element inside <ntp> contains a DNS name the phone may fail to update its clock even though NTP packets are received.
Security
The TFTP server responds to any client on the network. Anyone with network access can retrieve configuration files, including SIP credentials. Do not expose the TFTP server to the internet.